Showing posts with label exterior wood. Show all posts

Tuesday, June 5, 2007

This cOld House 31

It has been almost a whole month since my last blog and we are moving right along on a number of projects.

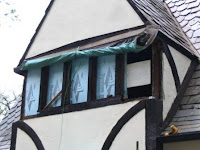
Since last month, Bob has been working diligently on several wood projects, the biggest being the posts out back. We removed and refurbished the windows in the girls' room and they look/work great! We have been really pleased with the restoration work Dick at Dayton Art Glass did. Aside from his very competitive price, we get the sense that he enjoys this type of work and puts a lot of care and skill into it. One of the windows needed a complete re-build, but they were able to salvage the glass and match the lead almost perfectly. The good news is, yes, we found the yellow jacket nest. It was located inside the post Bob removed. The post was so rotten that it was almost hollow. Here's an example of what shape the wood was in that Bob removed.That's some fine looking hardwood there! We were unable to find a piece of oak big enough replace the posts, so Bob improvised with two 4 x 8 cedar posts, and then he trimmed on the inside, where needed, with oak to match the original design.

We also had the main gas line replaced, and the new meter mounted on the front of the new garage. It's better than in the basement, but ugly as sin and we're planting some boxwoods around it as soon as possible. All the interior gas lines were replaced at the same time, so now we can actually pass the HVAC inspection. The bad news, (of course) is that none of the fireplace lines held test so they had to completely disconnect them to pass the gas inspection and we now have no gas to the fireplaces. We'll address that at a later date, once we get an assessment of the chimneys.

The other big project this month has been the 'Great Wall' which has taken about all month. The other day the mailman asked the wall guys if they wanted him to forward their mail to here. I told them another week and I'd start charging rent. They are doing beautiful work and we are very pleased with how it looks. Initially we wanted a rock wall, to replace the one that the backhoe split apart, but it was infeasible, (read that - way too expensive in this day and age!) so we settled for a landscape block and were relieved to discover our misgivings about the institutional look of the block were pretty well dashed. They had to haul off about half a dozen trucks of fill and we ended up with two full tiers. It's been slow going, and we've had some set backs, not the least of which was Mike digging up the brand new gas line, not once, but TWICE! I noticed when I did the pictures for this post that Mike was wearing the same shirt both times he hit the line (a week apart) so I told him to get rid of the unlucky t-shirt and bury it when they backfilled the second repair. Thank goodness he doesn't have far to go to be finished - I'd be worried if he were going to have to be digging around the line again!
Before


After

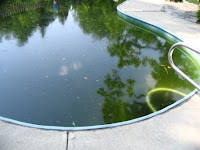
And last but not least... the pool is in the process of filling as I type. The garden hose has been on full-bore for the past 35 hours and we are about two-thirds full. I'm estimating the water bill at around $500 to fill that sucker. It's not a large pool but it is a good 8 feet deep. As we had suspected, the lines were bad - both the skimmer and return lines need to be replaced so we are going to hold that thought until next year... The pool guys will lay lines overground for this season and next fall or next spring we will put permanent lines in when we move the pool equipment off of the platform that's sliding down the hill and over towards the pool house that's falling down. (Another story.)

Tuesday, May 8, 2007

This cOld House 30

It's slow-going, but we are making progress.
The patio really looks like a patio. The parapet walls are essentially done. When we had them laid out, they looked too tall, so instead of scalloping them, we elected to make them about 6 inches shorter than code and we'll finish them off with a 2 1/2 inch diameter pipe railing. We can continue this railing down the new steps and along the front walk, (replacing the decrepit one currently there,) and it will all tie in nicely.

We have made some decisions on the work that needs to be done on the back of the house. Bob Sr. says he can save the frame around the dining room windows, (pending no ugly discoveries during removal of the adjacent posts,) but the news on the windows above wasn't as good. The bank of five windows in the Girls' room has to come out as the sill beneath is rotted through. He'll get to that in the next couple of days and the windows will go to Dayton Art Glass for restoration. Again, the good news here is that we will definitely find the yellow jacket nest in the process, and block the ingress to the house for all sorts of creepy crawlies when the window frame gets tightened up.

When Bob took out the living room doors last week, he found (no surprise here,) termite damage under the threshold and had to replace the joist, subfloor and floor. Thankfully, he was able to make the new threshold just wide enough to cover the parts he had to cut out so we don't have any floor patching to do. Picture is of another shredded board. Those termites were very well fed. Bob has also taken out the dining room doors, and Dayton Art Glass picked them up today to start restoration and size adjustment to fit the new oak frames Bob made.

We have the roof estimate. Sort of. I need to go through it with a fine-toothed comb, but I should be able to do that in the next day or so. Our new strategy is to 'fix' the stuff that needs to be fixed sooner or later, even if it's not leaking right now. This means pulling off and replacing all broken, damaged or poorly installed slates, (with salvaged material that matches,) replacing all the worn out copper, (essentially all valleys, window pans and dormers,) and replacing the johngeneered metal ridges with clay tile as they originally were. Did I mention that Sean, (the slate installer,) found squirrel nests up under the incorrectly installed ridge? (That would explain the squirrel poop in the attic.) It will cost a small fortune, but aside from routine yearly maintenance, (inspection and replacement of worn/broken slates,) we shouldn't have to do anything else for 30 years or so. We needn't replace the whole roof, nor use new slate. The pitch is sufficient enough that we should get another lifetime out of the current roof as long as it is PROPERLY maintained.

Monday, April 30, 2007

This cOld House 29

What's new this week? We met with Dick about the landscaping last Monday and although we lined out where the retaining walls were to go, the ensuing rains washed out all our work. Back to the drawing board.

We finally saw the roofers. They came last Monday and Tuesday and then disappeared. As bad as the concrete crew have been about showing up, the roofers are even worse. To compound this problem, when we first got the estimate (in December,) we were told that the roof was essentially sound and we were not advised to replace it. Instead we were told that it could (and should) be repaired using re-claimed slate to match. However, when the installer came out last week he said we should replace the whole thing and we should NOT use salvaged slate. So I called the office and said what gives? Your estimator and your installers are giving me two diametrically opposed opinions. So on Friday we had TWO estimators show up. We came up with a modified plan and I'm waiting on numbers to make a decision.

Bob Sr. is hard at work on the doors. It's beautiful weather now so working outside is wonderful. He's making the new screen doors (which he built from scratch,) fit up front today. It's a bear to get them in right since the opening is neither plumb nor square, and they have to swing, too. Still no decision on the back half of the house, (whether we have to take out the windows upstairs as well as the dining room,) and materials are looking to be a problem. 10 X 10 oak beams are hard to come by. We may have to use pressure treated and wrap it in oak or cedar.

The new garage is looking like a new garage. Dan piled a bunch of junk into it last weekend. The lift door was installed last week. They guys doing it didn't inspire a lot of confidence. The door weighs about double what a regular door weighs. They assembled it like they usually do but with the garage being brand new and no power in it yet they failed to secure a way out. There was plywood screwed from the old garage side in the cut opening between the two and the door was too heavy for the guys to lift up manually so they essentially locked themselves in the garage and had to break down the plywood to get out. All I heard was a bunch of cussing and hammering but when I saw the mess (and damage) in the old garage I figured out what happened. The blue pipes in the front are part of our elaborate drainage system that we hope will end our water problems in the garages and basement for good.

This is the final sand coat on the stucco where the old garage doors were. The guy doing it was having a heck of a time matching the texture of the existing stucco until I explained that the existing was original to the house and began its life as a smooth finish. When I described the ivy we've heard covered the place he finally understood. I told him to go ahead and just do a smooth sand coat. Dan and I both love the color of this stuff but sadly it's a little out of the vernacular for our house. But seeing this color has galvanized our decision to go with a slightly warmer cream color than we currently have. And we may use this terra cotta color somewhere on the inside... I was thinking the dining room.

Last but not least, we have a mason diligently working to build the parapet wall on top of the garage. I picked brick last week and found a hand made brick that mimicked the age and condition of what we had. The color was close, only a couple shades lighter. I think it'll work out ok. We are still deciding about what to do on the top of the wall. I wanted it scalloped, and it will be stucco, but we don't want to have to paint every year, which is what will happen if we stucco the top. Rob suggested limestone on the top and it's pretty expensive. We're still looking at options.

Thursday, April 5, 2007

This cOld House 27

I haven't blogged for a while which is more of an indication of the pace around here than my schedule... it's going pretty slow these days.

Steffan (the bug guy,) came out to spray for the yellow jackets in the girls' room. We spent some time staking out the back of the house to find the entry/exit of the nest, but came up short. We did find one hole where they were going in and out but we were not confident it led to the nest that is troubling us. There are so many gaps outside big enough for a yellow jacket to get it! All the beams have shrunk and pulled away from the stucco. And then there is the problem of rotting wood in the beams adjacent to the windows where we think the yellow jackets are nesting.

This is another one of those jobs that keeps popping up. Dan had been interested in restoring the outside timbers but after he punched a gaping hole indicating substantial rot, I had the big man (Bob Sr. - Rob's Dad) take a look. Because it was the first beam we decided to restore, and because it was so very rotten, and because it is a major STRUCTURAL element, (no, not decorative,) I felt we should have the professionals handle it while taking notes for future forays ourselves. We will be using a hybrid solution, part epoxy, part pressure-treated lumber, part white oak overlay to match the original beam. What you can't see in this picture is the perspective of depth. The beam is about 8 inches square, and the little hollow you see from this side is about 3 inches deep. Bob just kept picking away at it until he found solid wood. You know you're in trouble when you can remove structural elements with a dull soup spoon.

So along with the beam project, while we have the big guy working with us, (freed up from Rob's other job-in-perpetuity, a total remodel they've been working on for two years,) I asked for a bid to re-do some doors. The patio doors from the living room and dining room are in kind of rough shape. The metal frames have corroded and they stick, making them difficult to open. With the leaded sashes being so large (and old, and brittle,) they've sustained damage in the form of bowing, cracked panes and loose supports. New metal frames would have to be manufactured from scratch to match (since they don't make 'em like that anymore,) so rather than go through that expense we've decided to re-use the leaded sashes in a custom built oak frame instead. And he'll refurbish the existing screen doors and build us some for the front door (which are missing.)

Rob and Co filled the gaps in the flexicore with cement this week, as well as various other nit-noid stuff that needed to get done to prepare for the waterprooofing and final pour for the garage. the concrete guys cut the existing driveway to make way for some piping to carry storm water away from the house. We've been a little concerned about the down-spout situation in the back as all that water eventually shows up in the basement after seeping under the house.

And last but not least, the garage lift door is finally framed. Rob is eager to install it as it is taking up quite a lot of space in his shop. Some progress was made on cleaning out the garage space last week with Larry having at the large slabs cut for the walk through door to the old garage using a hand percussion hammer. There's still more to do before it's all gone - (the back hoe couldn't reach it when it back-filled a couple of weeks ago so it has to be removed by hand.)

We've had a cold spell hit again so the concrete guys can't do anything. Hopefully next week we'll get waterproofed so we can pour the week after that. I'm thinking we may be finished by June.